- Under Pages, select New
- The following items are required:
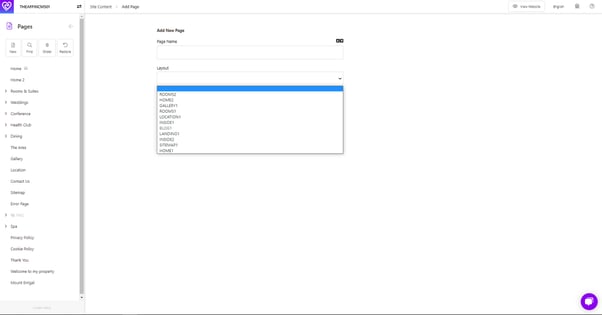
- Page Name: Title of page for internal use
- Layout. Choose desired layout for page. Note that these will vary for each website.
- Create Page.
- The newly created page will appear on the Pages column on the left-hand side.
- Click into the new page to begin adding content.
Please note that the page URL will automatically generate based on the page name. This can be updated by clicking into the page and selecting More Settings.

There are four sections that need to be completed when creating a new page.
1) Primary Section
Select the Main Content tab. Under this tab it is possible to:-
- Chose BANNER GALLERY
- Chose MOBILE BANNER IMAGE
- Add TITLE
- Edit TEXT AREA: Add & format any text to appear on the page in the WYSIWYG editor. Text must be pasted as plain text - use notepad to format the text first and then copy it to the page content in CMS as plain text (Ctrl + Shift + V)
- Add links to files
- Add a form to a page
- Activate Button links by adding buttons text and selecting button links
2) Gallery Section
-
Select your Inside Gallery. If left empty, no Inside Gallery will be showing on that page.
3) Secondary Section
Select option:
- Off - if you do not wish to display secondary section on this page
- Default – if you wish to use pre-set default Action Bar on this page – Read More (link to default settings)
- Custom- this lets you creating a custom Secondary Section that will display only on this page only. When selecting this option, you will need to continue to set up all components of the custom Secondary Section on that page: Image, Title, Text Area, Button Text, Button Link

4) Action Bar
- For more information on how to update your action bar click here
Once all sections have been completed, the page needs to be set live.
The page can be set live in two ways:-
- Under More Settings, ensure the Published box has been ticked
- Under the Pages column, click on the three dots next to the page that is to be made live.
- Select Enable
- The (disabled) will disappear from the Page name to indicate the page has been set public/live.