Please note: this guide applies to clients who are not contracted for marketing services with Net Affinity or avail of our Meta Search only marketing bundle. Net Affinity handles this integration for all marketing clients (except Meta Search only).
- In GTM, navigate to the relevant Account > Admin > Container Settings > check “Enable consent overview”
- Go back to your Container Settings and under the same section, click on “Import Container” and choose the container according to your system
- Choose Merge under import options
- Fields to update
- Variable: GA4 ID – Insert your existing GA4 ID or abandon this change if you were using the same variable before.
- Tags: Cookiebot – Remove the Cookiebot Tag.
- Tags: Universal Analytics Tags – Remove all the tags related to your Google Analytics - Universal Analytics tracking as Universal Analytics sunset on 1st of July 2023 to lighten your GTM container.
- Consent Overview (Navigate to Tags > and click on the Consent Overview account next to the New button in the top left corner):

- Check if all GA4 tags are under the "Consent Configured" section and their "Additional Consent” statuses are set to “None". If not, you might have GA4 – BKE Search & Reservation Form events. These events are retired, and you can remove these Tags. If you have custom GA4 tags for yourself, update the “Additional consent checks” options of these tags to “No additional consent required” and make sure their triggers are functional accordingly.
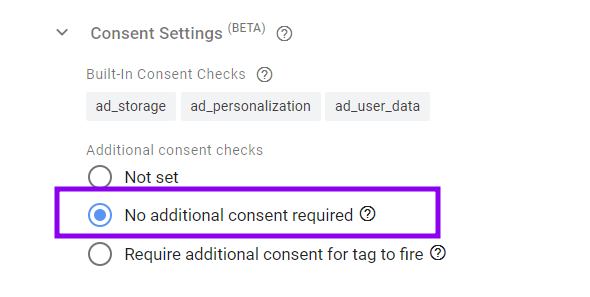
- Check if all Google Ads tags are under the "Consent Configured" section and their "Additional Consent” statuses are set to “None". If not, update the “Additional consent checks” options of these tags to “No additional consent required” and make sure their triggers are functional accordingly.
- Check if all Facebook / Microsoft / Pinterest / LinkedIn or other marketing platform tags are under the "Consent Configured" section and their "Additional Consent” statuses are set to “ad_storage". If not, update the “Additional consent checks” options of these tags to “Require additional consent” and choose its value as the “ad_storage”. Make sure their triggers are functional accordingly.
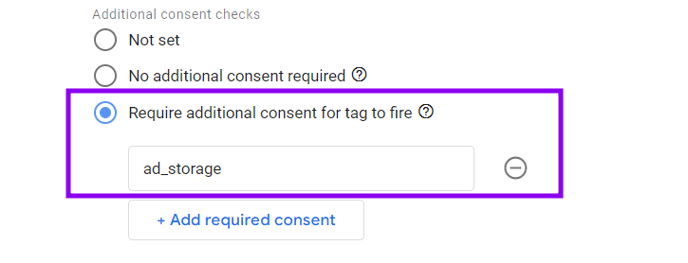
- For the other tags that you avail for statistical purposes and personalisation purposes, you can set their “Require additional consent” values to “analytics_storage” and “personalization_storage” respectively.
- Check if all GA4 tags are under the "Consent Configured" section and their "Additional Consent” statuses are set to “None". If not, you might have GA4 – BKE Search & Reservation Form events. These events are retired, and you can remove these Tags. If you have custom GA4 tags for yourself, update the “Additional consent checks” options of these tags to “No additional consent required” and make sure their triggers are functional accordingly.
- Please hold off on Publishing the changes on your GTM for now.
- Copy the Cookiebot ID either from the GTM Overview > Workspace Changes > Cookiebot > 3 Dots > View Change, or from your Cookiebot Account.
- Update your website settings:
- Update your booking engine & voucher system settings,
- For Net Affinity - v1 system, please follow the instructions here
- For Net Affinity - v2 system, please follow the instructions here
- For 3rd party booking or voucher systems, please contact your provider.
- Go back to your GTM account and Publish the GTM container.